PATTERNS: BURIAL GOWN
Downloadable Patterns
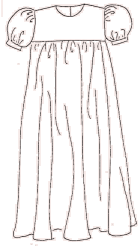
General Instructions
This is a unisex gown open at center back. The pattern includes 3 sizes based on the weight of the infant: Size A (1-3 pounds), Size B (3-5 pounds) and Size C (6-9 pounds). We have found that the hospitals do not really need of the smallest size.
| Size | Length X Width | # Cut |
|---|---|---|
| Size A Front | 17” X 14″ | 1 |
| Size A Back | 17” X 7″ | 2 |
| Size B Front | 18” X 14 ½” | 1 |
| Size B Back | 18” X 7 ¼” | 2 |
| Size C Front | 19” X 15” | 1 |
| Size C Back | 19” X 7 ½” | 2 |
Yoke
The yoke is self-faced. Before proceeding, outer front yoke section may be embellished with your choice of decorative design, ex. embroidery, applique, hand painting. This is optional.
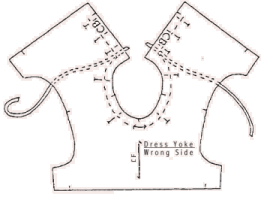
Figure 1
1. With right sides together, pin yoke sections along center back (CB) and neckline seams. Slip one 9″ length of ribbon between yoke layers on each side and position ribbon perpendicular to CB, and at the neckline edge. Pin in place, with end extending slightly beyond seam allowance (Figure 1).
2. Stitch smoothly around curve of neckline, starting at center front (CF) and going first to the right, then to the left. At neckline/CB, position needle in corner of intersection, raise machine presser foot and pivot fabric. Lower presser foot and continue stitching down CB to notch 3/8″ from raw edge (Figure 1).
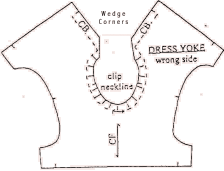
Figure 2
3. Clip neckline from raw edge to but not through stitching line. Wedge off line/CB seam allowance 1/8″ from stitching line (Figure 2).
4. Press seams open with point of iron. Tun to right side. Press flat. Hand or machine baste armholes of yoke layers, 1/8″ from seamline, to hold together while setting in sleeves.
Sleeve
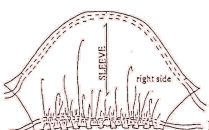
5. Stitch two rows of gathering threads 1/8″ apart along cap and bottom edges of sleeves between notches, leaving thread tails on both ends. The first row should be on the 1/4″ seamline. The second row should be 1/8″ inside the seam allowance (Figure 3).
6. Pull the bobbin threads on the sleeve edge, distributing gathers evenly, until the notches on the gathered edge match the notches on the sleeve band (Figure 3).
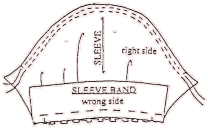
Figure 4
7. With right sides together, pin notched edge of sleeve band to gathered edge of sleeve (Figure 4). Stitch. Press seam allowance toward band.
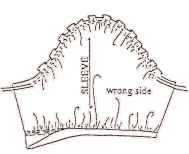
Figure 5
8. Press band up along foldline. Finish inside edge of band by folding under raw edge to 3/16” inch. Pin and stitch in place by hand or by stitching in the ditch from the front side (Figure 5).
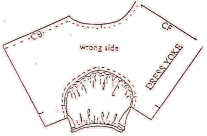
Figure 6
9. Gather sleeve cap to fit basted armhole between notches. Pin in place, distributing gathers evenly. Stitch.
Skirt
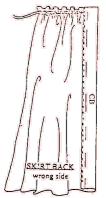
Figure 7
10. Press under 1 “at CB seam along foldline. Fold under raw edge of seam allowance ¼” and stitch along fold (Figure 7).
11. Along top edge of skirt front and backs, gather fullness to match notches on yoke. Stitch two rows of gathering stitches 1/8” apart, between notches on each skirt section. The first row should be on the 1/4″ seam. allowance. The second row should be 1/3” inside the seam allowance. Leave long thread tails and pull bobbin threads to gather fullness (Figure 7). Note: Skirt may also be pleated using pleat arrangement of choice.
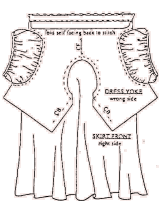
Figure 8
12. With right sides together, pin lower edge of outer front yoke to top edge of skirt, matching notches and side seams. If desired, fine bias covered cording can be inserted in seam’ between yoke and skirt at this time. Stitch, being careful not to catch inside of yoke. Press seam allowances toward yoke (Figure 8). Finish inside yoke edge by turning up seam allowance. Pin and stitch in place, by hand or by stitching in the ditch from front side.
13. Repeat for back sections.
14. With right sides together, pin front and back side seams together from sleeve band to bottom of skirt. Stitch, matching notches and underarm seam
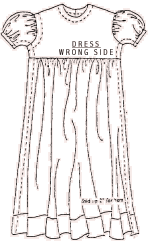
Figure 9
15. Turn up lower edge to form a 2″ hem. Press. Clean finish raw hem edge by turning under 1/4″ and stitching along fold (Figure 9).
Skirt
This T-shaped bonnet can be made from the same fabric as dress. It can be embellished using trim such as fine bias piping or lace edging, or by embroidery, appliqué or hand painting.
Notions: 4 feet of 1/8″ satin ribbon, cut into four 7″ lengths and two 10″ lengths. Cutting layout: Cut three rectangles of the same size as specified below:
Size A: 9 1/2″ x 2″
Size B: 10 1/2″ x 2 1/4″
Size C: 11 1/2″ X 2 1/2 ”
Sewing instructions: All seams are 1/4″ wide.

Figure 10
16. With right sides together, pin and stitch two rectangles along all edges, leaving a 3″ opening at center along one of the long sides. Wedge corners, turn cleanly and press (Figure 10). This is the front bonnet section. It will tie under chin.
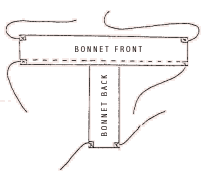
Figure 11
17. Fold remaining rectancle in half and stitch along side lengths. Wedge corners, turn cleanly and press (Figure 11). This will be the back bonnet section. Place back piece into 3″ opening and top stitch (Figure 11).
18. Attach 7″ ribbon to the 4 back corners and 10″ ribbon to the front. Fold under raw edges of ribbon and top stitch neatly to back side of bonnet.
Blanket
This blanket can also be made from the same fabric as dress. Cut one layer of fabric to the dimensions below. Corners may be rounded off. Trim as desired.
Size A: 22″ X 22″
Size B: 24″ X 26″
Size C: 28″ X 30″
